Cocoonで見出しのデザインを好みのものにカスタマイズする方法です。
見出し1(H1)は記事のタイトルで使われますので、記事本文中はH2~を利用します。
デザイン設定する為の指定方法と、まるごとコピー利用できるコードを載せています。
カスタマイズ方法
簡単なCSS追記のみです。
CSS追記は以下のいずれかから行って下さい。
外観→カスタマイズ→追加CSS
外観→テーマエディター→style.css
記事タイトル(H1)
シンプルに「h1タグ」で指定します。
カスタマイズ例
サンプルA

※記事タイトルサンプル画像です
上下にドット線を入れるCSS
h1{
font-size: 22px;
border-top: dotted 2px #9d9d9d;
border-bottom: dotted 2px #839b5c;
}
サンプルB

※記事タイトルサンプル画像です
1文字目を丸囲みするCSSは以下の通りです。
/*記事タイトル1文字目の設定*/
h1::first-letter {
background-color: #839b5c; /*背景色*/
border-radius:  50%; /*背景色丸み*/
padding:  10px; /*余白*/
font-size: 26px; /*文字サイズ*/
color: #fff; /*7文字色*/
margin-right: 5px;
}
見出し(H2~H5)
H2やH3タグは、サイドバーやウィジェットタイトルなどにも使われている為、記事内の見出しのみを変えたい場合は「entry-content」クラスを明示してCSSに記述します。
H2の記述例
サンプル

※見出しサンプル画像です
.entry-content h2{
color: #fff; /*文字色
font-size: 22px; /*文字サイズ*/
border-left: solid 10px #a8b751; /*左側に実線・色*/
}
上記CSSには背景色を指定していませんが、Cocoonの見出しデザインで、H2タグにはキーカラーを使って背景色をつけているので、背景色を変えたい場合は以下のように指定します。

※見出しサンプル画像です
background-color: #779dc4; /*好みの色*/
背景色を消したい場合は以下(サイト全体背景が白の場合)

※見出しサンプル画像です
background-color: #fff;
color: #a8b751; /*文字色*/
H2~H5 まるっとコピー
パターン1
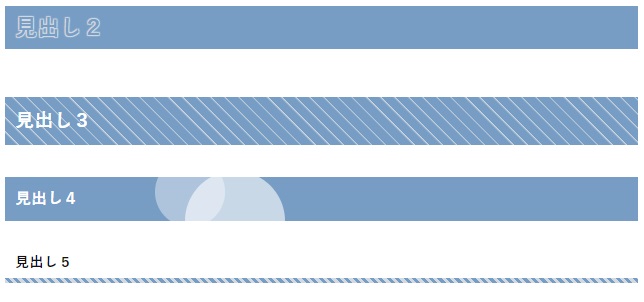
コードを表示
/************************/
/* 見出しタグ */
/************************/
.entry-content h2 {
color: #779dc4 !important;
padding: 5px 10px;
position: relative;
text-shadow: -1px -1px 1px #d1dae3, 1px -1px 1px #d1dae3, -1px 1px 1px #d1dae3, 1px 1px 1px #d1dae3;
z-index: 0;
}
.entry-content h2:before {
background: repeating-linear-gradient(45deg, #779dc4, #779dc4 8px, #fff 0, #fff 7px);
content: '';
position: absolute;
top: 0;
bottom: 0;
left: 0;
right: 0;
z-index: -2;
}
.entry-content h3 {
border-left:none;
color: #fff !important;
line-height: 20px;
padding: 10px;
background: repeating-linear-gradient(45deg, #779dc4, #779dc4 8px, #d1dae3 10px, #d1dae3 10px);
}
.entry-content h4{
width:100%;
background-color: #779dc4;
color: #fff !important;
overflow: hidden;
padding: 10px;
position: relative;
}
.entry-content h4:before{
background-color: #fff;
border-radius: 50%;
content: '';
display: block;
opacity: 0.4;
position: absolute;
top: -20px;
left: 150px;
width: 70px;
height: 70px;
}
.entry-content h4::after{
background-color: #fff;
border-radius: 50%;
content: '';
display: block;
opacity: 0.6;
position: absolute;
bottom: -50px;
left: 180px;
width: 100px;
height: 100px;
}
.entry-content h5 {
font-size: 16px;
line-height: 20px;
padding: 10px;
position: relative;
}
.entry-content h5:after {
content: " ";
width: 100%;
height: 5px;
bottom: 0;
left: 0;
position: absolute;
background: repeating-linear-gradient(45deg, #d1dae3, #d1dae3 3px, #779dc4 3px, #779dc4 6px);
}
パターン2
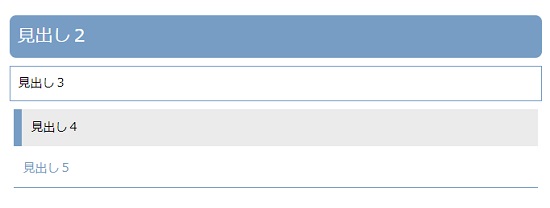
コードを表示
/************************/
/* 見出しタグ */
/************************/

.entry-content h2{
padding: 10px;
margin: 5px 0;
background: #779dc4;
border-radius: 8px;
color:#fff;
font-size:22px;
}
.entry-content h3{
padding: 10px;
margin: 10px 0;
color: #000;
border: solid 1px #779dc4;
}
.entry-content h4{
width:100%;
padding: 12px;
margin: 5px;
color: #000;
background: #ebebeb;
border-left: solid 10px #779dc4;
}
.entry-content h5{
padding: 12px;
margin: 5px;
color: #779dc4;
border-bottom: solid 1px #779dc4;
}
パターン3
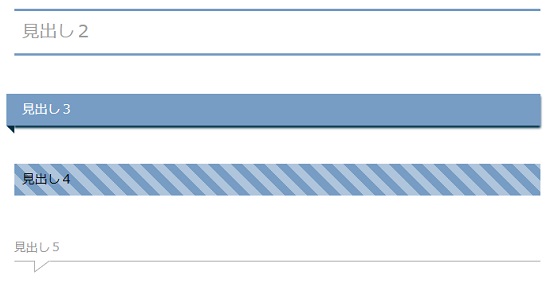
コードを表示
/************************/
/* 見出しタグ */
/************************/
.entry-content h2{
padding: 10px;
margin: 5px 0;
border-top: solid 3px #779dc4;
border-bottom: solid 3px #779dc4;
font-size:22px;
}
.entry-content h3 {
border-left:none;
color: #ffffff;
font-size: 16px;
line-height: 20px;
position: relative;
padding: 10px;
background: #779dc4;
box-shadow: 0 0 0 0 #779dc4, -10px 0 0 0 #779dc4, 0 3px 3px 0 #003046;
}
.entry-content h3:before {
content: " ";
position: absolute;
top: 100%;
left: -10px;
width: 0;
height: 0;
border-width: 0 10px 10px 0;
border-style: solid;
border-color: transparent;
border-right-color: #003046;
}
.entry-content h4 {
width:100%;
color: #000;
font-size: 16px;
line-height: 20px;
padding: 10px;
background: repeating-linear-gradient(45deg, #779dc4, #779dc4 10px, #afc5dc 10px, #afc5dc 20px);
}
.entry-content h5{
border-bottom: 1px solid #aaa;
margin: 15px 0;
padding: 5px 0;
position: relative;
}
.entry-content h5:before,
.entry-content h5:after {
content: '';
border-right: 20px solid #fff;
border-top: 15px solid #aaa;
bottom: -15px;
position: absolute;
left: 25px;
}
.entry-content h5:after {
border-top-color: #fff;
border-right-color: transparent;
bottom: -13px;
left: 26px;
}
パターン4
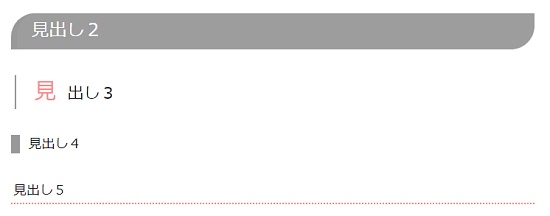
コードを表示
/************************/
/* 見出しタグ */
/************************/
.entry-content h2{
color: #fff;
font-size: 24px;
position: relative;
padding: 8px 0 8px 24px;
border-radius: 32px 0;
background: #9d9d9d;
}
.entry-content h3{
border:none;
font-size: 22px;
}
h3::first-letter {
padding: 10px;
font-size: 30px;
color: #fb8a8a;
margin-right: 2px;
border-left:solid 1px #9d9d9d;
}
.entry-content h4{
border:none;
width:100%;
position: relative;
padding-bottom: 0.5em;
font-size: 18px;
}
.entry-content h4::after {
position: absolute;
content: '';
left: 0;
bottom: 0;
width: 100%;
height: 7px;
box-sizing: border-box;
border-top: 3px solid #5a5a5a;
border-bottom: 1px solid #5a5a5a;
}
.entry-content h5{
padding: 0.2em;
border-bottom: dotted 2px #fb8a8a;
font-size: 18px;
}
パターン5
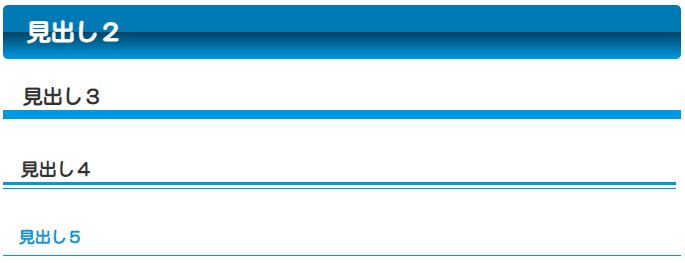
見出しサンプル
コードを表示
/************************/
/* 見出しタグ */
/************************/
.entry-content h2 {
color: #fff;
margin: 15px;
padding: 0.5em 1em;
border-radius:5px;
background: linear-gradient(#007ab5 0%, #007ab5 50%, #004364 50%, #0099e3 100%);
}
.entry-content h3{
padding: 0.5em 1em;
margin: 15px;
font-size: 20px;
border:none;
background: linear-gradient(transparent 80%, #0099e3 80%);
}
.entry-content h4 {
width: 95%;
margin: 15px;
padding: 0.5em 1em;
font-size: 18px;
border:none;
}
.entry-content h4::after {
position: absolute;
content: '';
left: 0;
bottom: 0;
width: 100%;
height: 7px;
box-sizing: border-box;
border-top: 3px solid #0099e3;
border-bottom: 1px solid #0099e3;
}
.entry-content h5{
padding: 0.5em 1em;
margin: 15px;
font-size: 16px;
color: #0099e3;
border-bottom: solid 1px #0099e3;
}
パターン6
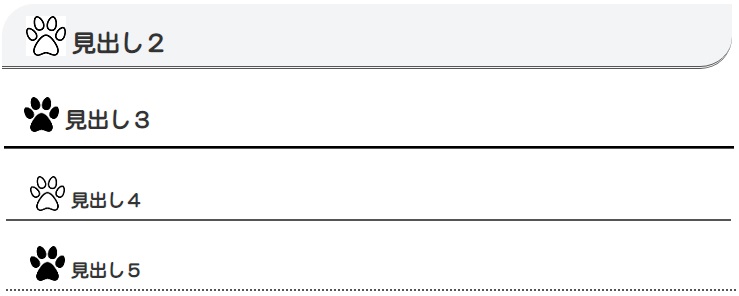
画像を使っています。画像はご自身でご用意ください。24~32pxの正方形がお勧め。
コードを表示
/************************/
/* 見出しタグ */
/************************/
.entry-content h2{
font-size: 24px;
position: relative;
padding: 8px 0 8px 24px;
border-radius: 32px 0;
border-left:none;
border-bottom: double 3px #555;
}
.entry-content h2:before {
top: 4px;
position: relative;
margin: 0 6px 0 0;
content: url(https://https://XXXXX/xxx.png);
}
.entry-content h3{
border:none;
border-bottom: groove 3px #555;
}
.entry-content h3:before {
top: 4px;
position: relative;
margin: 0 6px 0 0;
content: url(https://https://XXXXX/xxx.png);
}
.entry-content h4{
width:90%;
padding: 8px 0 8px 24px;
border:none;
border-bottom: solid 2px #555;
font-size: 18px;
}
.entry-content h4:before {
top: 4px;
position: relative;
margin: 0 6px 0 0;
content: url(https://https://XXXXX/xxx.png);
}
.entry-content h5{
padding: 8px 0 8px 24px;
border-bottom: dotted 2px #555;
font-size: 18px;
}
.entry-content h5:before {
top: 4px;
position: relative;
margin: 0 6px 0 0;
content: url(https://https://XXXXX/xxx.png);
}
サイドバー・フッターの見出し
サイドバー・フッターの見出しを同じように設定
.sidebar h3,.footer-in h3 {
font-size: 20px; /*文字サイズ*/
line-height: 20px; /*行の高さ
width:100%; /*幅*/
padding: 10px 15px; /*余白*/
margin-top: 20px;
border-radius: 8px; /*角の丸み*/
background-color:#839b5c; /*背景色*/
color:#fff; /*文字色*/
}
サイドバー・フッターのリスト
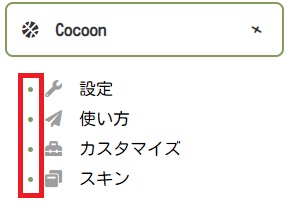
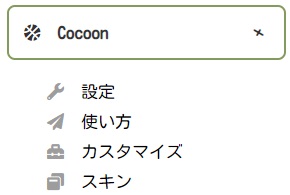
リストの「●」や「○」を消す
.sidebar ul li{list-style:none;}
ホバーアクションを指定

#footer-in ul li a:hover{
background-color:#fff;
color:#839b5c;
}
注意事項
初期設定されている見出しデザインの他、スキンを利用している場合も、初期デザインが異なるので、以下のまとめを参考に必要のない項目を打ち消したり、上書きしてデザインして下さい。
まとめ
見出しのクラス名
| タグ | セレクタ・クラス名 |
|---|---|
| 記事タイトル | h1 |
| 記事内見出し | .entry-content h2
.entry-content h3 .entry-content h4 .entry-content h5 |
| サイドバー見出し | .sidebar h3 |
| フッター見出し | #footer-in h3 |
デザイン用 簡単サンプル
| サンプル | |
|---|---|
| 背景色 | background-color: #fff; |
| 文字色 | color: #a8b751; |
| 文字サイズ | font-size: 22px; |
| 下線(実線) | border-bottom:solid 1px #a8b751; |
| 下線(ドット) | border-bottom:dotted 2px #a8b751; |
| 角を丸める | border-radius: 10px; |
カラーの変更
お好きなカラー設定には以下もご利用下さい。
マカロンビビッドパステル伝統色和色セーフ色名赤桃青紫黄橙緑茶黒




コメント
はじめまして。
以前こちらで見出しをコピペさせて頂きました。
今回見出しデザインの変更を考えているのですが、こちらで使わせて頂いたコードが強く(?)、別のコードが反映されず悩んでいます。
恥ずかしながらcssなどの知識はほぼゼロです。
新しいコードを反映させるためには、どのようにしたら良いかご教授願えませんでしょうか。
どうぞよろしくお願いいたします。
山﨑様
はじめまして。お返事遅くなり申し訳ありません。
えっと、、、
以前にコピーして頂いたコードを削除されるか、そのコード自体を編集されれば良いかと。
この件に限らず、必要のないコードを残したままにされない方が良いです。
ちなみに、同じクラス名に対して複数の記述がある場合、
表示結果は、CSSの行で下に書いているコードで上書きされます。
ご丁寧に返信くださってありがとうございました。
過去に記入したCSSの削除方法すらわかっていなかったので、迷走していました。
「コードを削除すれば良い」と教えていただき、無事思った通りにできました。
今回はお世話になりました。
ありがとうございました!